Forms Designer Quick Start Guide
Overview
Field2Base Forms Designer is the proprietary software application that allows your existing paper forms to be quickly converted to a smart E-form available to your end users via our mobile and web-based Mobile Forms applications.
This article describes the basic steps for creating a new Form using the Field2Base Forms Designer application. If you need to install Forms Designer, please see the Forms Designer Install Guide. Field2Base uniquely allows customers to use their existing forms as the background for their new digital Forms. A digital Form is built by inserting Regions on top of this background image.
Creating the Form Background
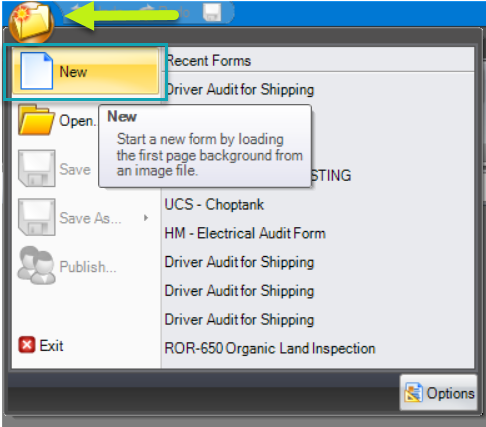
1. Open the Forms Designer application on your PC.
2. In the upper left hand corner, select the file folder icon then New.
3. Click the corresponding button to the type of file your form background is in.
A. Use Image File – Will allow you to select the image file to import. Valid file types are PNG, JPG, GIF, and BMP.
B. Use PDF File – Will allow you to select the PDF file to import.
C. Use Microsoft Office Document – Will allow you to select the Microsoft Office document to import. Valid file types are Excel(XLS, XLSX) Word (DOC, DOCX) and Publisher (PUB).

Note: Forms Designer converts all backgrounds to images using GhostScript. You will be prompted to install GhostScript the first time you try to use a PDF or Office document as a background.
4. Select the Page Quality for your imported pages if you are converting files to an image.
5. Select the pages you want to import. All pages are selected by default. You can click each page to deselect or select specific pages.
Adding Regions to the Form
Now that your Form background has been imported, you need to create the areas for your Mobile Forms Users to enter data. At Field2Base, these areas are called Regions. You will need to create a Region for every area of the Form where the User will enter data. The intent of this article is to give a brief overview, please see the article on Creating Regions for more details on how to customize each Region.
1. To create a Region, click and hold down the left mouse button to draw a box on the Form starting at the top left corner of the box and ending at the bottom right hand corner.
Note: Make sure the Region button is selected under the Form tab in Forms Designer when creating a Region. This button is active by default.
2. Once your Region is drawn, the Create Region dialog box is displayed.
3. In the General tab, set the Region properties using the fields described below.
A. Region name (required) - Enter a unique name for your region. Region names cannot contain spaces or special characters. We recommend one of the following formats: "ClientApproval" or with an underscore "Client_Approval".
B. Region type (required) - Select the Region type you need from the drop-down menu. For details on all of the Region types available, see the article on Region Types.
C. Enable Quick Copy for this region (checked by default) - Uncheck this box if you do not want your Users to copy the data from this Region from a previously sent Form in to a new Form. See the section on Quick Copy in the Mobile Forms User Guide for more information on Quick Copy.
 Note: Some Region types, such as GPS and Pen, do not allow Quick Copy.
D . This field is required - Select this option if the Region needs to contain data before the Form can be sent. If no data has been entered, the Mobile Forms application will direct the User back to this Region for completion before being able to send the Form.
4. You can change the Font, Color and Alignment in the Display tab. The red preview box displays how the data will appear on the Form.
Previewing the Form
At any time during the design process, you can preview your Form to see how it will work in the Mobile Forms application.
1. Select the Home tab on the menu ribbon at the top of the page.
2. Select the Preview button.
3. Click on any of the Regions you created and enter data to ensure they are working properly.
4. Click on Validate + Send to test your required regions and any script run during validation and/or sending.
5. Click on the End Preview button to exit the preview screen and return to the design view.
Note: The preview mode in Forms Designer may not function exactly as the Form would function on a mobile device. It is recommended that you publish your Form and review it on a mobile device for more accurate testing.

Hint: You can uncheck a checkbox in Preview Mode by highlighting it and pressing the space bar.
Saving the Form
Your digital Form can be saved as a file (*.eform) to your local PC. As part of the installation process, a folder in your documents directory called “My Forms” was automatically created. Forms Designer will save your eForm files to the "My Forms" folder by default.
Note: In order to prevent losing your work, Forms Designer will automatically save your Form in progress to the My Forms > Autosave folder every 5 minutes.
1. In the upper left hand corner of the screen, click on the File icon and select Save.
2. The first time you save your Form, you will be prompted to name it if you haven't already done so.
This is the name that will appear to your Users. Spaces are allowed for Form names, however you may not use special characters.
3. Click OK.
4. By default, the file name will be the same as the Form name.
5. Select Save.
Form Properties
You can customize additional Form Properties such as the title, version and page navigation.
To open Form Properties, click on the Properties button in the Form tab at the top of your Forms Designer window.
General Tab
A. Form Name - You can create or edit the Form name as needed.
B. Form ID - This is the globally unique ID that is used to apply versioning, Workflows, E-mail Templates and Folders to your Form. See the article on Editing a Form ID for details on when and how to edit a Form Template ID.
C. Revision - Displays the current version of your Form.
D. File Format - Displays the version that your eForm is saved in. You can use the drop down to change this version. A Form cannot be opened in a lower version of the Mobile Forms application. For example, if the eForm version is 7.0 but some of your Users are using Mobile Forms 6.9, they will get an error when trying to open the Form. See the article on Xml.PullParserException Error Troubleshooting for details.
E. Description - You can add a description of your Form and it will be part of the metadata.
F. Disable page navigation and require scripting or buttons to navigate the form - Check this box if you want to disable swiping page to page to navigate pages. You will need to use buttons and/or scripting to control page navigation in your Form. This is unchecked by default.
G. Disable Quick Copy for the entire form - Check this option if you do not want your tablet users to be able to Quick Copy any data from previously Sent Forms. Checking this option will overwrite all Regions individually enabled for Quick Copy. This is unchecked by default.
Title Tab
You can set a customized title for your form which includes data from Form Regions. This is very useful when receiving e-mailed PDFs or when trying to find a specific Sent Form. For example, the full name for a Sent Form could be: Sample Form - Customer: Jane Doe Date: 4/28/2018.
Note: If you don't set a title all your Sent Forms will display the same Form name and will be much harder to filter.
Publishing the Form
Once you have created your Form, you will need to publish it so you can test it live and your Users can access it using the Mobile Forms app on a Device.
1. In the upper left hand corner of the screen, click on the file folder icon and select Publish.
2. The first time you publish, you will be prompted to enter the credentials that were supplied to you by Field2base to log in to the Portal.
3. The first time you publish each Form, you will be asked to associate it with a Folder. Choose the Folder you want to associate with the Form and click OK.
See the Folders section in the Portal Quick Start Guide for more information on how to use Folders to control access to specific Forms.
4. Once your Form has been published, you will receive a confirmation message. You can now access your published Form in the Mobile Forms application.
Popular Articles
SQL Datasource Regions
Overview This article describes how to set up a SQL Datasource Region in Forms Designer. A SQL Datasource allows you to pull data from external Form Data Files into your Form. This is a convenient option when you need to make updates on a regular ...Mobile Forms iOS Install Via the Apple App Store
Tutorial Video A tutorial video is also available and covers most of this material if you prefer to watch an overview of how to install the app. Accessing the Apple App Store There should be an icon for the Apple App Store on the home screen of your ...Forms Designer Quick Start Guide
Overview Field2Base Forms Designer is the proprietary software application that allows your existing paper forms to be quickly converted to a smart E-form available to your end users via our mobile and web-based Mobile Forms applications. This ...Portal 11.28.2023 Release Notes
Overview Our release notes offer brief descriptions of product enhancements and bug fixes. We include links to the current articles for any affected features. Those articles will be updated shortly after the Portal release to include new ...Integration Service Configuration Guide
How To Configure Integration Services To Allow Read/Write Access on a Network Path All of our Integration Products, including the DIM, DUU, and EDM have respective Windows Services responsible for communicating with our server. Occassionally, ...