Creating Regions
Overview
This article is intended for Form Designers who have already installed Forms Designer and started a new Form Template. You can refer to the Forms Designer Quick Start Guide if you have questions about how to start a new, edit or publish a new Form. This article describes how to add a Region and the general properties for all Region types. For more in-depth information on each Region type and their specific properties, see the article on Region Types.
A Region is a field on your company's Field2Base Form. Regions are the individual fields you define on top of the background image to allow Mobile Forms app Users to enter data.
Regions come in many types, including include Text, Numeric, Date, Drop-Down, Checkbox, and Camera. They can be required, can be hidden on the Form, or populate data based on what is entered somewhere else on the Form. Basically, Regions and their definitions create a Smart Form to ensure data consistency and readability.
Tutorial Video
A tutorial video is also available and covers most of this material if you prefer to watch the steps to create a Region.
Adding a Region
1. Click on the Form tab on the menu at the top of the screen.
2. Select Region if it is not already selected. It will be highlighted yellow if selected.
3. Determine where you want to draw your Region. Holding down the left mouse button, draw a box on the background starting at the top left corner and ending at the bottom right corner. Let go of the mouse button to determine your Region placement, size and shape.
4. Once your Region is completed, you will be presented with a Create Region dialog box. The Create Region dialog box allows you to set specific properties for each Region. There are multiple tabs at the top of the dialog box. Each of these tabs contains a set of options for the Region. Different Region types may have different tabs available. All Region Types have the general tab as the first tab displayed.
General Tab
A. Region name (required) - Enter a unique name for your Region. Region names need to be in one of the following formats: one word ("ClientApproval") or with an underscore ("Client_Approval"). The name may not contain spaces or special characters.

Note: Field2Base highly recommends that you name your regions to match your Form background. For example, if your Form background has an area for Last Name, name your Region "LastName".
B. Region type (required) - Select the Region type you need from the drop-down menu. For information on all available Region types, see the article on Region Types .
C. Enable Quick Copy for this region - Checking this option will allow Mobile Forms Users to Quick Copy data into this Region on a new Form from a previously sent Form. This is checked by default if available. Some Region types do not allow Quick Copy and this option will be grayed out. See the Quick Copy section of the Mobile Forms User Guide for details on how Quick Copy works in the Mobile Forms app.
D. This field is required -Checking this option will require the Region to contain data before the Form can be sent. If no data has been entered, the Mobile Forms application will direct the User back to this field for completion before being able to send the Form. This is unchecked by default.
E. This field value is locked - Checking this option will not allow the User to enter or change existing information in the Region. It is possible to lock and unlock Regions using scripting so this is typically only used in conjunction with script. This is unchecked by default.
F. Include this field in analytics - Checking this option will allow the data from this Region to be used if analytics is enabled for this Form. Analytics Dashboards are available to select license tiers and are custom created by the Professional Services team. You can refer to the Analytics Dashboards article or reach out to the Professional Services team for more information. This is unchecked by default.
G. Tab index - Users can navigate to the next field on a form using the Tab key on a keyboard when using Web App. The tab index option allows you to set the order in which each Region will be highlighted when a user presses the tab key.
H. Region instructions - This field can be used to provide your Mobile Forms Users with further instructions on how to enter data in the Region. Your instructions are presented to the User as a small question mark in the Region. When the User clicks on the question mark, they will see the additional instructions.
Display Tab
The Display tab allows you to customize the appearance of the Region data on your Form. Some types of Regions have more or less options on the Display tab. If there are additional options, the details are available in the article on Region Types .
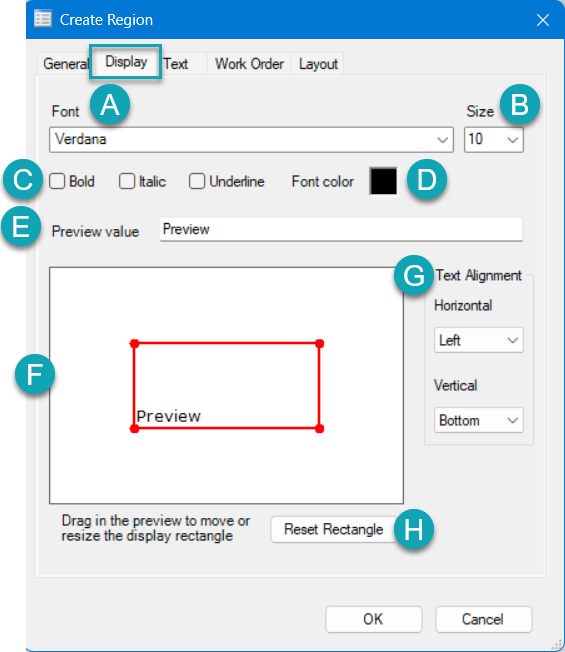
A. Font - Allows you to select the font that will appear in the Region. Default is Verdana.
B. Size - Allows you to set the font size of the numbers in the Region. Default is 10.
C. Bold, Italic, Underline - Allows you to bold, italicize and/or underline the text in the Region.
D. Font color - Allows you to select the color of the data in the Region. Default is black.
E. Preview value - You can edit the preview value by typing your desired value in this field. This can be useful when trying to make sure the expected data length will fit in your Region size with the selected font.
F. The red box in the preview window shows where the Region is placed on the Form background.
 Note: We do not recommend resizing or moving a Region using this red box since it may behave differently across platforms and cause unexpected issues. If you need to move or resize a Region, you should do it by dragging the Region itself.
G. Reset Rectangle - This will reset the red box back to the original placement and dimensions of the Region.
H. Text Alignment - You can edit the Horizontal (Left, Center or Right) and the Vertical alignment (Top, Middle, Bottom) of the text in the Region.
Work Orders Tab
The Work Orders tab allows you to customize the Region for prefilling and dispatching in a Work Order. Field2Base offers several options for assigning Work Orders to your Mobile Forms Users but the options in this tab apply only to Work Orders that are manually dispatched from the Portal. You can refer to the article on Dispatching Work Orders from the Portal for details.

A. Enable this Region for use with Work Orders in the Portal - Allows the Region to appear as an available Region for a dispatcher to fill out in a Work Order. This is checked by default.
B. Order index of this region on the Work Order page - Allows you to customize your the order of Regions on the Create Work Order page in Portal. For example, if your Region has a value of “1” for this option, then it will be the first Region listed on the Work Order page. This only applies to the Create Work Order page not the Create Work Order (Form) page which displays the Form Template.
C. Require this region when entering Work Order data - Checking this option requires the dispatcher to complete this Region before they can complete the Work Order.
E. Default value on Work Order page - Allows you to set a default value for this Region each time the dispatcher opens a new Work Order.
Layout Tab
The Layout tab allows you to move or resize your Region manually instead of clicking and dragging to get your exact Region bounds.
Other Tabs Available
Different types of Regions offer type specific tabs in the Create Region dialog box. For more in-depth information on each Region type and their specific properties, see the article on Region Types .
Popular Articles
SQL Datasource Regions
Overview This article describes how to set up a SQL Datasource Region in Forms Designer. A SQL Datasource allows you to pull data from external Form Data Files into your Form. This is a convenient option when you need to make updates on a regular ...Mobile Forms iOS Install Via the Apple App Store
Tutorial Video A tutorial video is also available and covers most of this material if you prefer to watch an overview of how to install the app. Accessing the Apple App Store There should be an icon for the Apple App Store on the home screen of your ...Forms Designer Quick Start Guide
Overview Field2Base Forms Designer is the proprietary software application that allows your existing paper forms to be quickly converted to a smart E-form available to your end users via our mobile and web-based Mobile Forms applications. This ...Portal 11.28.2023 Release Notes
Overview Our release notes offer brief descriptions of product enhancements and bug fixes. We include links to the current articles for any affected features. Those articles will be updated shortly after the Portal release to include new ...Integration Service Configuration Guide
How To Configure Integration Services To Allow Read/Write Access on a Network Path All of our Integration Products, including the DIM, DUU, and EDM have respective Windows Services responsible for communicating with our server. Occassionally, ...