Managing Unique IDs in the Portal
Creating a Unique ID Counter
Before you can use a Unique ID Region in your Form, you must create a Unique ID counter in the Field2Base Portal. The Unique ID Region will be using this counter to populate the next Unique ID each time one of your Users start a new Form. You can use the same Unique ID counter across multiple Forms. For details on how to add a Unique ID counter to a Form, please read the article on Unique ID Regions.
1. Navigate to Admin > Unique IDs.

Note: The Unique ID feature is enabled by default for new companies. If you do not see Unique ID listed in the Admin menu, please contact Field2Base Support to enable this feature.
2. Click Create to open the New IDs window.
3. Enter the appropriate data to configure your Unique ID counter.
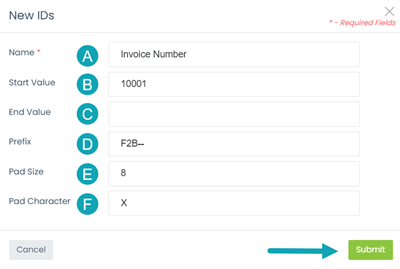
A. Name (required) - Set the name of the counter. You will use this name when you create your Unique ID Region in Forms Designer.B. Start Value (optional) - The first number in the counter. The default start number is 1 but you can change it as needed.C. End Value (optional) - The maximum number for the counter. Once the maximum value is reached, the Form will create an error and cannot be sent until the counter is restarted. You should only use this option if you know you will have a limited amount of Forms.D. Prefix (optional)- This will be pre-pended to each Unique ID. For example, you could add a department prefix to your Unique IDs such as F2B-PS 000001.E. Pad Size (optional) - The length of your serial number. The prefix is not counted in the pad size. You do need to specify a pad character for your pad size in order for it to work.F. Pad Character (optional)- The character used to fill spaces of your pad size.Example: If the Start Value is 10001, Prefix is "F2B-- ", Pad Size is 8, and Pad Character is "X", then the first serial number will be F2B--XXX10001 followed by F2B--XXX10002.
4. Click Submit.
Viewing Your Unique IDs
You can view the available Unique IDs counters on the Unique IDs page. You can filter your list by Unique ID Name and Status (default is both Active and Disabled). You can download a list of your Unique IDs by clicking on either the Export, Excel or CSV buttons.
Disabling or Enabling a Unique ID
You can disable a Unique ID counter if you are no longer using it. You can also re-enable an Unique ID once it has been disabled.

Note: A Unique ID can also be archived but this can currently only be done by Field2Base. Please contact Field2Base Support if you wish to have a Unique ID archived.
1. Click on Select an Action for the Unique ID that you wish to disable or enable.
2. Select Disable or Enable.
Editing a Unique ID
1. Click on Select an Action for the Unique ID that you wish to edit.
2. Select Edit.
3. Modify the Unique ID properties as needed. You can edit the Name, End Value, Prefix, Pad Size and Pad Character for an existing Unique ID. The only value you cannot edit is the Start Value.
Note: A Unique ID counter can be restarted but this can currently only be done by Field2Base. Please contact Field2Base Support if you wish to have a Unique ID start over from the Start Value.4. Click on Submit.
Get Next ID
You can get the next value in a Unique ID counter if you want to use the next number without opening a new Form.

Warning: This will use the next number in your counter and make that value unavailable when the next Form is started. For example, if your Last Used ID is 5 and you use Get Next ID, you will be using the 6 value and the next new form will have 7 as the Unique ID.
1. Click on Select an Action.
2. Choose Get Next ID. A Dialog box will appear with the next Unique ID.
Popular Articles
SQL Datasource Regions
Overview This article describes how to set up a SQL Datasource Region in Forms Designer. A SQL Datasource allows you to pull data from external Form Data Files into your Form. This is a convenient option when you need to make updates on a regular ...Mobile Forms iOS Install Via the Apple App Store
Tutorial Video A tutorial video is also available and covers most of this material if you prefer to watch an overview of how to install the app. Accessing the Apple App Store There should be an icon for the Apple App Store on the home screen of your ...Forms Designer Quick Start Guide
Overview Field2Base Forms Designer is the proprietary software application that allows your existing paper forms to be quickly converted to a smart E-form available to your end users via our mobile and web-based Mobile Forms applications. This ...Portal 11.28.2023 Release Notes
Overview Our release notes offer brief descriptions of product enhancements and bug fixes. We include links to the current articles for any affected features. Those articles will be updated shortly after the Portal release to include new ...Integration Service Configuration Guide
How To Configure Integration Services To Allow Read/Write Access on a Network Path All of our Integration Products, including the DIM, DUU, and EDM have respective Windows Services responsible for communicating with our server. Occassionally, ...