Data Integration Module (DIM) Migration Guide
Overview
This article provides the information necessary to migrate the Field2Base Data Integration Module (DIM) over from one server to another.
Please refer to the DIM Install Guide for the initial installation of the Field2Base DIM.
Once that's complete, you can proceed with the topics below.
Stopping service on the old DIM

Note: You must schedule an acceptable time to shut down the existing DIM service. The service must be stopped before moving any files. During this time no information will be gathered to the DIM.
1. You must stop service on the old DIM before starting it on the new DIM. Thus, go back to the computer with the old DIM, and open the DIM Project Manager.
Select Service on the top menu bar.
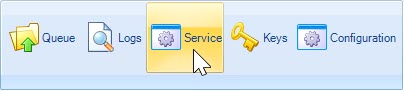
2. Click Stop .
Exporting Keys from the old DIM
What is a key in the context of the DIM?
Keys are what the DIM uses to be able to encrypt and decrypt Digital Envelopes it gathers from the server. A new Key is automatically generated whenever the DIM is installed on a machine. However, all of the Project Files you moved over from the previous install are expecting to work with the old Key, so you will need to export the old Key from the previous install and import it into the new DIM. You can do this by opening the DIM Admin from the old install and doing the following:
1. Select Keys on the top menu bar.
2. Highlight the key(s) you wish to export and click the the Export Private Key button.
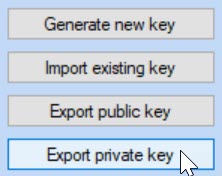
3. Save the private key certificate file to a file path accessible to the new DIM or prepare it for transfer via an external storage device. (Hard Drive, Thumb Drive etc.) 
Copy files from the old DIM
These files have all of your project information in them and copying them to the new DIM is imperative to have it run as before.
- Go the the folder where your old DIM is located. Typical location: C:\Program Files (x86)\F2B Data Integration Module
- Copy the following file folders by utilizing an external or network drive:
- Projects folder
- F2BDataIntegrationService.exe.config file
- Log.sdf file
- Transformer.sdf
- Optional: FormData folder
Note: The FormData folder is where copies of all historical data captured by the DIM is stored. Because of this it is easily the largest capacity folder in the list and you may or may not want to transfer it to the new host machine. However, if you are hoping to reprocess previously captured information again in the new install's location you will want to make sure the FormData folder is also copied over.
Overwriting/replacing files on the new computer
- Open the folder where new DIM is installed. Typical location: C:\Program Files (x86)\F2B Data Integration Module
- Select the files from the external/network drive and copy them to the new location.
- Select the option to Replace the files in the destination .
Importing Previous Keys For Use With New Install
What is a key in the context of the DIM?
Keys are what the DIM uses to be able to encrypt and decrypt Digital Envelopes it gathers from the server. A new Key is automatically generated whenever the DIM is installed on a machine. However, all of the Project Files you moved over from the previous install are expecting to work with the old Key, so you will need to export the old Key from the previous install and import it into the new DIM. You can do this by opening the DIM Admin from the old install and doing the following:
- Move your focus to the new installation of the DIM and Open up the same Keys menu.
- Click Import Existing Key .
- Select the cert file you saved before using your File Browser to import the file as an existing Key.
This should allow you to keep using the same files from your Project Folder with the new install.
Activating the new DIM install
The last step to take before starting the new DIM service is to activate the new install.
- Open the newly installed DIM Administrator.
- Select Configuration on the top menu bar.
- Click the Activate Button.
- Enter a set of Field2Base User Credentials with the appropriate permissions.
- The Activate Button should disappear and you should now see a Company ID and Activation ID displayed in the Configuration Tab
Starting service on the new DIM
Now you can start the DIM service on the new computer to begin gathering data.
1. Select Service on the top menu bar.
2. Click Start .
DIM Migration FAQ
Following your DIM migration you may notice some differences between your old and new installs. This section covers some of our most frequently asked questions.
We used to have envelopes, image files, and xml files in the FormData folder for the DIM, They are no longer there. What happened to them?
The latest DIM no longer stores the raw data in the FormData folder. It will be a digital envelope that keeps that data encrypted at rest and the DIM converts appropriately when processed.
The latest DIM no longer stores the raw data in the FormData folder. It will be a digital envelope that keeps that data encrypted at rest and the DIM converts appropriately when processed.
How would I view this data? (Pictures/XML)
You can view the data by opening it up in the DIM Admin Utility. There is a new option in the right click menu to view it.
You can view the data by opening it up in the DIM Admin Utility. There is a new option in the right click menu to view it.
What do I do if a Form fails processing in the DIM?
With the more recent versions of the DIM, you have the ability to re-download and/or reprocess the Form if it’s been deleted for some reason or there was a download issue. To do this go into the DIM Admin, go to the Queue, right click on the failed item and click "redownload and reprocess".
With the more recent versions of the DIM, you have the ability to re-download and/or reprocess the Form if it’s been deleted for some reason or there was a download issue. To do this go into the DIM Admin, go to the Queue, right click on the failed item and click "redownload and reprocess".
On my old install, the DIM dropped CSV files into a pre-defined local file path and the new DIM does not. How do I fix this?
Each Project File that generates CSVs has a file path that the CSVs are dropped into. You can update the path by opening your Project File(s) in your favorite text editor and updating the <outputDirectory> line under the <writeCsv> block. Make sure that the new DIM service has the appropriate access/permissions to interact with the newly defined file path.
Each Project File that generates CSVs has a file path that the CSVs are dropped into. You can update the path by opening your Project File(s) in your favorite text editor and updating the <outputDirectory> line under the <writeCsv> block. Make sure that the new DIM service has the appropriate access/permissions to interact with the newly defined file path.
I'm getting errors after migrating pertaining to SQL Server Compact Edition 3.5 SP2 and my DIM Service won't start. How do I fix this?
If you are migrating to a host machine that does not support SQL Server Compact Edition 3.5 SP2 (for example, Windows Server 2008 supports it, but Windows Server 2012 does not) then files migrated, mainly the Transformer.sdf file, will not be able to be read because SQL Server CE 3.5 SP2 might not have installed correctly. You can either start again with an empty Transformer file, or attempt to manually install SQL Server CE 3.5 SP2 Microsoft official site.
Popular Articles
SQL Datasource Regions
Overview This article describes how to set up a SQL Datasource Region in Forms Designer. A SQL Datasource allows you to pull data from external Form Data Files into your Form. This is a convenient option when you need to make updates on a regular ...Mobile Forms iOS Install Via the Apple App Store
Tutorial Video A tutorial video is also available and covers most of this material if you prefer to watch an overview of how to install the app. Accessing the Apple App Store There should be an icon for the Apple App Store on the home screen of your ...Forms Designer Quick Start Guide
Overview Field2Base Forms Designer is the proprietary software application that allows your existing paper forms to be quickly converted to a smart E-form available to your end users via our mobile and web-based Mobile Forms applications. This ...Portal 11.28.2023 Release Notes
Overview Our release notes offer brief descriptions of product enhancements and bug fixes. We include links to the current articles for any affected features. Those articles will be updated shortly after the Portal release to include new ...Integration Service Configuration Guide
How To Configure Integration Services To Allow Read/Write Access on a Network Path All of our Integration Products, including the DIM, DUU, and EDM have respective Windows Services responsible for communicating with our server. Occassionally, ...